今回はWebpackの基本知識を紹介します。
Webpackとは
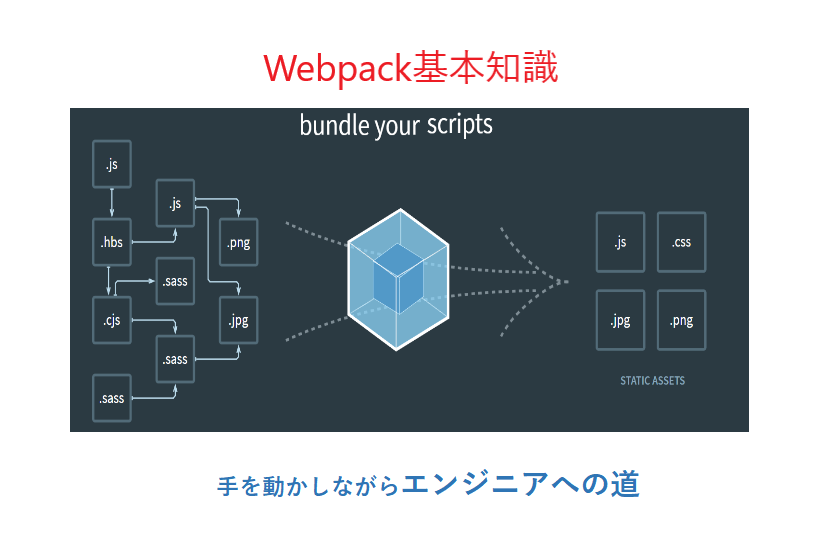
webpackとは、複数のファイルを1つにまとめて出力してくれるツールのこと。
五つコア項目
Entry
エントリーポイントの設定。複数設定することも可能。
エントリーポイントとはモジュール間の依存関係の解析を開始する地点のこと。
Output
出力するファイル名や出力先のパスを指定する。※出力先のパスの指定にはpath.join()を利用する。
Loader
JavaScriptファイル以外の他の言語で書かれたプログラムをwebpackで扱う場合にはLoader(ローダー)を使用する
Plugins
ローダーは特定のタイプのモジュールの変換に使用しますが、プラグインはバンドルの最適化や資産管理など様々なものが存在し、利用することで幅広いタスクを実行することができます。
Mode
webpack4から追加された項目となります。
モードはdevelopment、production、noneが存在する。
| development |
process.env.NODE_ENVの値をdevelopment
NamedChunksPlugin,NamedModulesPluginを有効 |
ローカル開発環境 |
| production |
process.env.NODE_ENVの値をproduction
FlagDependencyUsagePlugin,FlagIncludedChunksPlugin,
ModuleCOncatenationPlugin,NoEmitOnErrorsPlugin,
OccurrenceOrderPlugin,SideEffectsFlagPlugin,UglifyJsPluginを有効 |
本番環境 |
Webpack使い方
webpackのインストール
npm install webpack webpack-cli -g
パッケージ作成
パッケージをローカルインストールするため、package.jsonは以下のコマンドで生成する。
npm init -y
コマンドで実行
デフォルトでは、js,jsonファイルを利用できますが、cssを利用できない。cssも利用できるため、webpackの設定ファイルで指定できます。
webpack ./src/index.js -o ./build/ –mode=development
webpack ./src/index.js -o ./build/ –mode=production
webpackの設定ファイル
webpackを利用するためにはwebpack.config.jsというファイルに設定を記述する必要がある。
設定内容(webpack.config.js)
const path = require(‘path’);
module.exports = {
// エントリーポイントの設定
entry: ‘./src/index.js’,
// 出力の設定
output: {
// 出力するファイル名
filename: ‘build.js’,
// 出力先のパス(絶対パスを指定する必要がある)
path: path.join(__dirname, ‘build’)
},
// loaderの設定
module: {
rules: [
// 詳細内容
]
},
// pluginsの設定
plugins: [
// 詳細内容
],
mode: ‘development’
// mode : ‘production’
}
const path = require(‘path’);
module.exports = {
// エントリーポイントの設定
entry: ‘./src/index.js’,
// 出力の設定
output: {
// 出力するファイル名
filename: ‘build.js’,
// 出力先のパス(絶対パスを指定する必要がある)
path: path.join(__dirname, ‘build’)
},
// loaderの設定
module: {
rules: [
// 詳細内容
{
// cssファイル
test: /\.css$/,
use: [
// styleタグを作成し、jsに定義したスタイルコードをstyleタグに挿入し、
// headに追加する
‘style-loader’,
‘css-loader’
]
}
]
},
// pluginsの設定
plugins: [
// 詳細内容
],
mode: ‘development’
// mode : ‘production’
}
lessファイル,画像ファイル,htmlファイル,icon-fontなど
const path = require(‘path’);
const HtmlWebpackPlugin = require(‘html-webpack-plugin’);
module.exports = {
// エントリーポイントの設定
entry: ‘./src/index.js’,
// 出力の設定
output: {
// 出力するファイル名
filename: ‘build.js’,
// 出力先のパス(絶対パスを指定する必要がある)
path: path.join(__dirname, ‘build’)
},
// loaderの設定
module: {
rules: [
// 詳細内容
{
// lessファイル
test: /\.less$/,
use: [
‘style-loader’,
‘css-loader’,
‘less-loader’
]
},
{
// cssのurl画像ファイル
test: /\.(jpg|png|gif)$/,
loader: ‘url-loader’,
options: {
// 8k以内の場合、base64文字で表示する
limit: 8 * 1024,
// url-loaderはデフォルトでes6モジュールで解析、falseに設定したら、commonjsで解析
esModule: false,
// ファイル名
name: ‘[hash:10].[ext]’,
outputPath: ‘images’
}
},
{
// htmlのimgタグ
test: /\.html$/,
loader: ‘html-loader’
},
{
// その他
exclude: /\.(css|less|js|html|jpg|png|gif)$/,
loader: ‘file-loader’
}
]
},
// pluginsの設定
plugins: [
// 詳細内容
new HtmlWebpackPlugin({
template: ‘./index.html’
})
],
mode: ‘development’
// mode : ‘production’
}
devServer(開発環境構築)
インストール
npm i webpack-dev-server -D
webpack.config.js編集
const path = require(‘path’);
const HtmlWebpackPlugin = require(‘html-webpack-plugin’);
module.exports = {
// エントリーポイントの設定
entry: ‘./src/index.js’,
// 出力の設定
output: {
// 出力するファイル名
filename: ‘build.js’,
// 出力先のパス(絶対パスを指定する必要がある)
path: path.join(__dirname, ‘build’)
},
// loaderの設定
module: {
rules: [
// 詳細内容
]
},
// pluginsの設定
plugins: [
// 詳細内容
new HtmlWebpackPlugin({
template: ‘./index.html’
})
],
mode: ‘development’,
// mode : ‘production’
// webpack-dev-serverコマンドで起動
devServer: {
contentBase: path.join(__dirname, ‘build’),
compress: true,
port: 3000,
open: true
}
}
起動
npx webpack server
CSSを別ファイルに書き出す
mini-css-extract-pluginを利用し、cssファイルを別ファイルに書き出す。
インストール
npm i mini-css-extract-plugin -D
webpack.config.jsの設定
const path = require(‘path’);
const HtmlWebpackPlugin = require(‘html-webpack-plugin’);
const MiniCssExtractPlugin = require(‘mini-css-extract-plugin’);
module.exports = {
// エントリーポイントの設定
entry: ‘./src/js/index.js’,
// 出力の設定
output: {
// 出力するファイル名
filename: ‘js/build.js’,
// 出力先のパス(絶対パスを指定する必要がある)
path: path.join(__dirname, ‘build’)
},
// loaderの設定
module: {
rules: [
// 詳細内容
{
// cssファイル
test: /\.css$/,
use: [
MiniCssExtractPlugin.loader,
‘css-loader’
]
}
]
},
// pluginsの設定
plugins: [
// 詳細内容
new HtmlWebpackPlugin({
template: ‘src/index.html’
}),
new MiniCssExtractPlugin({
filename: ‘css/app.css’
})
],
mode: ‘development’
// mode : ‘production’
}
postcssでcss最適化
インストール
npm i postcss-loader postcss-preset-env -D
package.json編集
package.jsonに以下の内容を追加する
“browserslist”: {
“development”: [
"last 1 chrome version”,
"last 1 firefox version”,
"last 1 safari version”
],
“production”: [
[
">0.2%”,
"not dead”,
"not op_mini all”
webpack.config.js編集
const path = require(‘path’);
const HtmlWebpackPlugin = require(‘html-webpack-plugin’);
const MiniCssExtractPlugin = require(‘mini-css-extract-plugin’);
process.env.NODE_ENV = ‘production’
module.exports = {
// エントリーポイントの設定
entry: ‘./src/js/index.js’,
// 出力の設定
output: {
// 出力するファイル名
filename: ‘js/build.js’,
// 出力先のパス(絶対パスを指定する必要がある)
path: path.join(__dirname, ‘build’)
},
// loaderの設定
module: {
rules: [
// 詳細内容
{
// cssファイル
test: /\.css$/,
use: [
MiniCssExtractPlugin.loader,
‘css-loader’,
{
loader: ‘postcss-loader’,
options: {
postcssOptions: {
plugins: [
require("postcss-preset-env”)(),
]pan>
}
}
}
]
}
]
},
// pluginsの設定
plugins: [
[
// 詳細内容
new HtmlWebpackPlugin({
template: ‘src/index.html’
}),
new MiniCssExtractPlugin({
filename: ‘css/app.css’
})
] mode: ‘development’
// mode : ‘production’
}
css圧縮_optimize-css-assets-webpack-plugin
インストール
npm i optimize-css-assets-webpack-plugin -D
webpack.config.js編集
const path = require(‘path’);
const HtmlWebpackPlugin = require(‘html-webpack-plugin’);
const MiniCssExtractPlugin = require(‘mini-css-extract-plugin’);
const OptimizeCssAssetsWebpackPlugin =require(‘optimize-css-assets-webpack-plugin’);
process.env.NODE_ENV = ‘production’
module.exports = {
// エントリーポイントの設定
entry: ‘./src/js/index.js’,
// 出力の設定
output: {
// 出力するファイル名
filename: ‘js/build.js’,
// 出力先のパス(絶対パスを指定する必要がある)
path: path.join(__dirname, ‘build’)
},
// loaderの設定
module: {
rules: [
[
// 詳細内容
{
// cssファイル
test: /\.css$/,
use: [
MiniCssExtractPlugin.loader,
‘css-loader’,
{
loader: ‘postcss-loader’,
options: {
postcssOptions: {
plugins: [
require("postcss-preset-env”)(),
] }
}
}
]
}
]
},
// pluginsの設定
plugins: [
[
// 詳細内容
new HtmlWebpackPlugin({
template: ‘src/index.html’
}),
new MiniCssExtractPlugin({
filename: ‘css/app.css’
}),
new OptimizeCssAssetsWebpackPlugin()
] mode: ‘development’
// mode : ‘production’
}
jsチェック_eslint
インストール
npm i eslint-loader eslint eslint-config-airbnb-base eslint-plugin-import -D
package.json編集
“eslintConfig” : {
“extends”: “airbnb-base”
}
webpack.config.js編集
const path = require(‘path’);
const HtmlWebpackPlugin = require(‘html-webpack-plugin’);
const MiniCssExtractPlugin = require(‘mini-css-extract-plugin’);
const OptimizeCssAssetsWebpackPlugin =require(‘optimize-css-assets-webpack-plugin’);
process.env.NODE_ENV = ‘production’
module.exports = {
// エントリーポイントの設定
entry: ‘./src/js/index.js’,
// 出力の設定
output: {
// 出力するファイル名
filename: ‘js/build.js’,
// 出力先のパス(絶対パスを指定する必要がある)
path: path.join(__dirname, ‘build’)
},
// loaderの設定
module: {
rules: [
[
// 詳細内容
{
// cssファイル
test: /\.css$/,
use: [
MiniCssExtractPlugin.loader,
‘css-loader’,
{
loader: ‘postcss-loader’,
options: {
postcssOptions: {
plugins: [
require("postcss-preset-env”)(),
] }
}
}
]
},
{
test: /\.js$/,
exclude: /node_modules/,
enforce: ‘pre’,
loader: ‘eslint-loader’,
options: {
fix: true
}
}
]
},
// pluginsの設定
plugins: [
[
// 詳細内容
new HtmlWebpackPlugin({
template: ‘src/index.html’
}),
new MiniCssExtractPlugin({
filename: ‘css/app.css’
}),
new OptimizeCssAssetsWebpackPlugin()
] mode: ‘development’
// mode : ‘production’
}
jsファイル内容(チェックしない行)
function x(sx, xs) {
return sx + xs;
}
// eslint-disable-next-line
console.log(x(2, 3));
js最適化_babel,core-js
インストール
npm i babel-loader @babel/core core-js @babel/preset-env -D
webpack.config.js編集
const path = require(‘path’);
const HtmlWebpackPlugin = require(‘html-webpack-plugin’);
const MiniCssExtractPlugin = require(‘mini-css-extract-plugin’);
const OptimizeCssAssetsWebpackPlugin = require(‘optimize-css-assets-webpack-plugin’);
process.env.NODE_ENV = ‘production’
module.exports = {
// エントリーポイントの設定
entry: ‘./src/js/index.js’,
// 出力の設定
output: {
// 出力するファイル名
filename: ‘js/build.js’,
// 出力先のパス(絶対パスを指定する必要がある)
path: path.join(__dirname, ‘build’)
},
// loaderの設定
module: {
rules: [
[
// 詳細内容
{
// cssファイル
test: /\.css$/,
use: [
MiniCssExtractPlugin.loader,
‘css-loader’,
{
loader: ‘postcss-loader’,
options: {
postcssOptions: {
plugins: [
require("postcss-preset-env”)(),
] }
}
}
]
},
{
test: /\.js$/,
exclude: /node_modules/,
loader: ‘eslint-loader’,
options: {
fix: true
}
},
{
test: /\.js$/,
exclude: /node_modules/,
loader: ‘babel-loader’,
options: {
presets: [[
[‘@babel/preset-env’,
{
useBuiltIns: ‘usage’,
corejs: {
version: 3
},
targets: {
chrome: ’60’,
firefox: ’60’,
ie: ‘9’,
safari: ’10’,
edge: ’17’
}
}
]v>
]
}
}
]
},
// pluginsの設定
plugins: [
[
// 詳細内容
new HtmlWebpackPlugin({
template: ‘src/index.html’
}),
new MiniCssExtractPlugin({
filename: ‘css/app.css’
}),
new OptimizeCssAssetsWebpackPlugin()
]mode: ‘development’
// mode : ‘production’
}
html,js圧縮
jsではmodeがproductionの場合、自動的に圧縮されるため、特に設定が必要ない。
htmlの圧縮ではHtmlWebpackPluginにminifyパラメータを追加します。
webpack.config.js編集
const path = require(‘path’);
const HtmlWebpackPlugin = require(‘html-webpack-plugin’);
const MiniCssExtractPlugin = require(‘mini-css-extract-plugin’);
const OptimizeCssAssetsWebpackPlugin = require(‘optimize-css-assets-webpack-plugin’);
process.env.NODE_ENV = ‘production’
module.exports = {
// エントリーポイントの設定
entry: ‘./src/js/index.js’,
// 出力の設定
output: {
// 出力するファイル名
filename: ‘js/build.js’,
// 出力先のパス(絶対パスを指定する必要がある)
path: path.join(__dirname, ‘build’)
},
// loaderの設定
module: {
rules: [
[
// 詳細内容
{
// cssファイル
test: /\.css$/,
use: [
MiniCssExtractPlugin.loader,
‘css-loader’,
{
loader: ‘postcss-loader’,
options: {
postcssOptions: {
plugins: [
require("postcss-preset-env”)(),
] }
}
}
]
},
{
test: /\.js$/,
exclude: /node_modules/,
loader: ‘eslint-loader’,
options: {
fix: true
}
},
{
test: /\.js$/,
exclude: /node_modules/,
loader: ‘babel-loader’,
options: {
presets: [
[
[‘@babel/preset-env’,
{
useBuiltIns: ‘usage’,
corejs: {
version: 3
},
targets: {
chrome: ’60’,
firefox: ’60’,
ie: ‘9’,
safari: ’10’,
edge: ’17’
}
}
] ]
}
}
]
},
// pluginsの設定
plugins: [
[
// 詳細内容
new HtmlWebpackPlugin({
template: ‘src/index.html’,
minify: {
// スペース削除
collapseWhitespace: true,
// コメント削除
removeComments: true
}
}),
new MiniCssExtractPlugin({
filename: ‘css/app.css’
}),
new OptimizeCssAssetsWebpackPlugin()
]/mode: ‘development’
mode : ‘production’
}
性能改善
HMR有効
webpack.config.js編集
devServer: {
contentBase: path.join(__dirname, ‘build’),
compress: true,
port :3000,
open: true,
hot: true
}
jsファイル変更
if (module.hot) {
module.hot.accept(‘./xxx.js’,function() {
//xxx.js変更があれば、実行
xxxx();
})
}
source-map(デバッグ用)
webpack.config.js編集
devServer: {
contentBase: path.join(__dirname, ‘build’),
compress: true,
port :3000,
open: true,
hot: true
},
devtool: ‘eval-source-map’
oneOf
const path = require(‘path’);
const HtmlWebpackPlugin = require(‘html-webpack-plugin’);
const MiniCssExtractPlugin = require(‘mini-css-extract-plugin’);
const OptimizeCssAssetsWebpackPlugin = require(‘optimize-css-assets-webpack-plugin’);
process.env.NODE_ENV = ‘production’
module.exports = {
// エントリーポイントの設定
entry: ‘./src/js/index.js’,
// 出力の設定
output: {
// 出力するファイル名
filename: ‘js/build.js’,
// 出力先のパス(絶対パスを指定する必要がある)
path: path.join(__dirname, ‘build’)
},
// loaderの設定
module: {
rules: [
[
// 詳細内容
{
test: /\.js$/,
exclude: /node_modules/,
enforce: ‘pre’,
loader: ‘eslint-loader’,
options: {
fix: true
}
},
{
oneOf: [
{
// cssファイル
test: /\.css$/,
use: [
MiniCssExtractPlugin.loader,
‘css-loader’,
{
loader: ‘postcss-loader’,
options: {
postcssOptions: {
plugins: [
require("postcss-preset-env”)(),
] }
}
}
]
},
{
test: /\.js$/,
exclude: /node_modules/,
loader: ‘babel-loader’,
options: {
presets: [
[
[‘@babel/preset-env’,
{
useBuiltIns: ‘usage’,
corejs: {
version: 3
},
targets: {
chrome: ’60’,
firefox: ’60’,
ie: ‘9’,
safari: ’10’,
edge: ’17’
}
}
] ]
}
}
]
}
]
},
// pluginsの設定
plugins: [
[
// 詳細内容
new HtmlWebpackPlugin({
template: ‘src/index.html’,
minify: {
// スペース削除
collapseWhitespace: true,
// コメント削除
removeComments: true
}
}),
new MiniCssExtractPlugin({
filename: ‘css/app.css’
}),
new OptimizeCssAssetsWebpackPlugin()
]e: ‘development’,
// mode : ‘production’
devServer: {
contentBase: path.join(__dirname, ‘build’),
compress: true,
port: 3000,
open: true,
hot: true
},
devtool: ‘source-map’
}
キャッシュ
babelキャッシュはcacheDirectory: trueを追加します。
ファイルキャッシュはファイル名にcontenthashを追加します。
{
test: /\.js$/,
exclude: /node_modules/,
loader: ‘babel-loader’,
options: {
presets: [
[
[‘@babel/preset-env’,
{
useBuiltIns: ‘usage’,
corejs: {
version: 3
},
targets: {
chrome: ’60’,
firefox: ’60’,
ie: ‘9’,
safari: ’10’,
edge: ’17’
}
}
] ],
cacheDirectory: true
}
}
jsファイルのキャッシュ対応:
output: {
// 出力するファイル名
filename: ‘js/build.[contenthash:10].js’,
// 出力先のパス(絶対パスを指定する必要がある)
path: path.join(__dirname, ‘build’)
}
cssファイルのキャッシュ対応:
new MiniCssExtractPlugin({
filename: ‘css/app.[contenthash:10].css’
}),
tree shaking
webpack などでファイルをバンドルする際に、デッドコード(利用されていない不要なコード)を除去してファイルを出力すること
以下の条件となります。
・ES2015(ES6)のimport/export構文でモジュールのエクポート、インポートする
・productionモードで実行(Tree Shaking するための設定が有効になる)
指定したファイルを除去しない。
package.jsonに「sideEffects: ["*.css”,”*.less["*.css”,”*.less”]>
code split
入口複数定義
複数入口を定義すると、入り口のファイルが追加したら、定義も追加する必要のため、良くない感じですね。
const path = require(‘path’);
const HtmlWebpackPlugin = require(‘html-webpack-plugin’);
process.env.NODE_ENV = ‘production’
module.exports = {
// エントリーポイントの設定
//entry: ‘./src/js/index.js’,
entry: {
index: ‘./src/js/index.js’,
test: ‘./src/js/test.js’
},
// 出力の設定
output: {
// 出力するファイル名
filename: ‘js/[n[name]span>.[c[contenthash[name],[c[contenthash:10]gt; // 出力先のパス(絶対パスを指定する必要がある)
path: path.join(__dirname, ‘build’)
},
// loaderの設定
module: {
rules: [
[
// 詳細内容
]gt;
// pluginsの設定
plugins: [
[
// 詳細内容
new HtmlWebpackPlugin({
template: ‘src/index.html’,
minify: {
// スペース削除
collapseWhitespace: true,
// コメント削除
removeComments: true
}
})
]‘development’
}
optimization項目で定義
node_modulesのライブラリファイル(jqueryなど)を別ファイルに出力する
const path = require(‘path’);
const HtmlWebpackPlugin = require(‘html-webpack-plugin’);
process.env.NODE_ENV = ‘production’
module.exports = {
// エントリーポイントの設定
entry: ‘./src/js/index.js’,
// 出力の設定
output: {
// 出力するファイル名
filename: ‘js/[n[name]c[contenthash:10]s[n[name]c[contenthash:10] // 出力先のパス(絶対パスを指定する必要がある)
path: path.join(__dirname, ‘build’)
},
// loaderの設定
module: {
rules: [
[
// 詳細内容
]gt;
// pluginsの設定
plugins: [
[
// 詳細内容
new HtmlWebpackPlugin({
template: ‘src/index.html’,
minify: {
// スペース削除
collapseWhitespace: true,
// コメント削除
removeComments: true
}
})
]lor: #ff0000;"> optimization: {
splitChunks: {
chunks: ‘all’
}
},
mode: ‘development’
}
jsコードで別ファイルに出力
jsファイルに以下のコードで書けます。
import(
/* webpackChunkName: ‘tests’ */‘./test’)
.then((mul) => {
console.log(mul)
})
.catch( () => {
console.log(‘error’);
});
lazy loading
以下のコードでlazy loadingとなります。
document.getElemnetById(‘btn’).onclick = function() {
import(/* webpackChunkName: ‘test’*/’./test’).then(({mul}) =>{
console.log(mul(4,6));
})
}
prefetch
普通はjsファイルは並行でアクセスしますが、prefetchで普通のjsファイルをダウンロードされたら、prefetchのjsをアクセスします。
document.getElemnetById(‘btn’).onclick = function() {
import(/* webpackChunkName: ‘test’, webpackPrefetch:true */’./test’).then(({mul}) =>{
console.log(mul(4,6));
})
}
PWA
インストール
npm i workbox-webpack-plugin -D
webpack.config.js編集
const path = require(‘path’);
const HtmlWebpackPlugin = require(‘html-webpack-plugin’);
const WorkBoxWebpackPlugin = require(“workbox-webpack-plugin”);
process.env.NODE_ENV = ‘production’
module.exports = {
// エントリーポイントの設定
entry: ‘./src/js/index.js’,
// 出力の設定
output: {
// 出力するファイル名
filename: ‘js/[n[name]c[contenthash:10]s[n[name]c[contenthash:10] // 出力先のパス(絶対パスを指定する必要がある)
path: path.join(__dirname, ‘build’)
},
// loaderの設定
module: {
rules: [
[
// 詳細内容
]gt;
// pluginsの設定
plugins: [
[
// 詳細内容
new HtmlWebpackPlugin({
template: ‘src/index.html’,
minify: {
// スペース削除
collapseWhitespace: true,
// コメント削除
removeComments: true
}
}),
new WorkBoxWebpackPlugin.GenerateSW({
clientsClaim: true,
skipWaiting: true
})
]ation: {
splitChunks: {
chunks: ‘all’
}
},
mode: ‘development’
}
package.json編集
“
eslintConfig“: {
“extends”: “airbnb-base”,
“env”:{
“browser”: true
}
}
jsコード
if (‘serviceWorker’ in navigator) {
window.addEventListener(‘load’,()=>{
navigator.serviceWorker.register(‘/service-worker.js’)
.then(()=>{
console.log(‘OK’);
})
.catch(()=>{
console.log(‘error’);
})
})
}
確認
serve -s build
thread-loader
インストール
npm i thread-loader -D
webpack.config.js編集
const path = require(‘path’);
const HtmlWebpackPlugin = require(‘html-webpack-plugin’);
const WorkBoxWebpackPlugin = require(“workbox-webpack-plugin”);
process.env.NODE_ENV = ‘production’
module.exports = {
// エントリーポイントの設定
entry: ‘./src/js/index.js’,
// 出力の設定
output: {
// 出力するファイル名
filename: ‘js/[n[name]c[contenthash:10]s[n[name]c[contenthash:10] // 出力先のパス(絶対パスを指定する必要がある)
path: path.join(__dirname, ‘build’)
},
// loaderの設定
module: {
rules: [
[
// 詳細内容
{
test: /\.js$/,
exclude: /node_modules/,
use: [
{
loader: ‘thread-loader’,
options: {
Workers: 3
}
},
{
loader: ‘babel-loader’,
options: {
presets: [
[
‘@babel/preset-env’,
{
useBuiltIns: ‘usage’,
corejs: {
version: 3
},
targets: {
chrome: ’60’,
firefox: ’60’,
ie: ‘9’,
safari: ’10’,
edge: ’17’
}
}
] ],
cacheDirectory: true
}
}
],
}
]
},
// pluginsの設定
plugins: [
[
// 詳細内容
new HtmlWebpackPlugin({
template: ‘src/index.html’,
minify: {
// スペース削除
collapseWhitespace: true,
// コメント削除
removeComments: true
}
}),
new WorkBoxWebpackPlugin.GenerateSW({
clientsClaim: true,
skipWaiting: true
})
]ation: {
splitChunks: {
chunks: ‘all’
}
},
mode: ‘development’
}
externalsを使うと、指定したモジュールをバンドル対象から外して外部依存のままにできる。
ブラウザの<script>タグで別途CDNからjQueryをロードする前提で、かつソース内でjQueryを importしていると、webpack実行時にはモジュール解決できずエラーになってしまうが、externals指定することでエラーを回避できる。
mode: ‘development’,
externals: {
jquery: ‘jQuery’
}
}
dll
webpack.dll.js作成
const {resolve} = require(‘path’)
const webpack = require(‘webpack’)
module.exports = {
entry: {
jquery: [[‘jquery’]div>
[[‘jquery’]gt;
output: {
filename: ‘[n[name]s’,
[n[name] path: resolve(__dirname, ‘dll’),
library: ‘[n[name]h[hash]
plugins: [
[
new webpack.DllPlugin({
name: ‘[name][hash] path: resolve(__dirname,’dll/[n[name]anifest.json’)[n[name]v> })
],
mode: ‘production’
}
webpack実行
webpack –config webpack.dll.js
インストール
npm i add-asset-html-webpack-plugin -D
webpack.config.js編集
const path = require(‘path’);
const HtmlWebpackPlugin = require(‘html-webpack-plugin’);
const webpack = require(‘webpack’);
const AddAssetHtmlWebpackPlugin = require(‘add-asset-html-webpack-plugin’);
process.env.NODE_ENV = ‘production’
module.exports = {
// エントリーポイントの設定
entry: ‘./src/js/index.js’,
// 出力の設定
output: {
// 出力するファイル名
filename: ‘js/[n[name]c[contenthash:10]s[n[name]c[contenthash:10] // 出力先のパス(絶対パスを指定する必要がある)
path: path.join(__dirname, ‘build’)
},
// loaderの設定
module: {
rules: [
[
// 詳細内容
]gt;
// pluginsの設定
plugins: [
[
// 詳細内容
new HtmlWebpackPlugin({
template: ‘src/index.html’,
minify: {
// スペース削除
collapseWhitespace: true,
// コメント削除
removeComments: true
}
}),
new webpack.DllReferencePlugin({
manifest: path.join(__dirname,’dll/jquery-manifest.json’)
}),
new AddAssetHtmlWebpackPlugin({
filepath: path.join(__dirname, ‘dll/jquery.js’)
})
]ation: {
splitChunks: {
chunks: ‘all’
}
},
mode: ‘production’
}
entryの書き方
一つ入口
以下のように内容を記載すると、一つbundleファイルを出力され、ファイル名は「main」です。
entry: ‘./src/js/index.js’,
複数入口
配列
以下のように内容を記載すると、一つbundleファイルを出力され、ファイル名は「main」です。
entry: [[‘./src/index.js, ‘./s[‘./src/index.js, ‘./src/test.js’]
以下のように内容を記載すると、複数bundleファイルが出力されます。
entry: {
// bundleファイルを出力
index: ‘./src/index.js’,
// bundleファイルを出力
test: ‘./src/test.js’
},
特殊
entry: {
// bundleファイルを出力
index: [[‘./src/index.js’,’.[‘./src/index.js’,’./src/gogo.js’]ルを出力
test: ‘./src/test.js’
},
outputの書き方
output: {
// 出力するファイル名
filename: ‘js/[n[name]c[contenthash:10]s[n[name]c[contenthash:10] // 出力先のパス(絶対パスを指定する必要がある)
path: path.join(__dirname, ‘build’),
publicPath: ‘/’,
chunkFilename: ‘[n[name]hunk.js’, // [n[name]のchunk名称
library: ‘[n[name],
[n[name] libraryTarget: ‘window’
},
moduleの書き方
module: {
rules: [
[
// 詳細内容
{
test: /\.js$/,
exclude: /node_modules/,
include: path.join(__dirname, ‘src’),
enforce: ‘pre’, // 優先
//enforce: ‘post’ // 遅延
//use: [‘style-loader’, ‘css-loader’] loader: ‘eslint-loader’ // 一つ
},
{
oneOf: []
}
]
},
resolve書き方
resolve: {
alias: {
$css: path.join(__dirname, ‘src/css’)
},
extensions: [[‘.js’,’.json’,’[‘.js’,’.json’,’.jsx’,’.css’]modules: [p[path.join(__dirname, ‘[path.join(__dirname, ‘../../node_modules’), ‘node_modules’]t;
devServer
devServer: {
contentBase: path.join(__dirname, ‘build’),
watchContentBase: true,
watchOptions: {
ignored: /node_modules/
},
compress: true,
port: 5000,
host: ‘localhost’,
open: true,
hot: true,
clientLogLevel: ‘none’,
quiet: true,
overlay: false,
proxy: {
‘/api’: {
target: ”,
pathRewrite: {
‘^/api’: ”
}
}
}
}
optimization
インストール:
npm i terser-webpack-plugin -D
webpack.config.jsファイル:
const TerserWebpackPlugin = require(‘terser-webpack-plugin’)
optimization: {
splitChunks: {
chunks: ‘all’,
// 以下はデフォルト値
/*
minSize: 30 * 1024,
maxSize: 0,
minChunks: 1,
maxAsyncRequests: 5,
maxInitialRequests: 3,
automaticNameDelimiter: ‘~’,
name: true,
cacheGroups: {
vendors: {
test: /[\[\\/]de_modules[\[\\/][\[\\/]iv> [\[\\/] priority: -10
},
default {
minChunks: 2,
priority: -20,
reuseExistingChunk: true
}
}*/
},
runtimeChunk: {
name: entrypoint => `runtime-${entrypoint.name}`
},
minimizer: [
// js,css圧縮
new TerserWebpackPlugin ({
cache: true,
parallel: true,
sourceMap: true
})
]gt;
